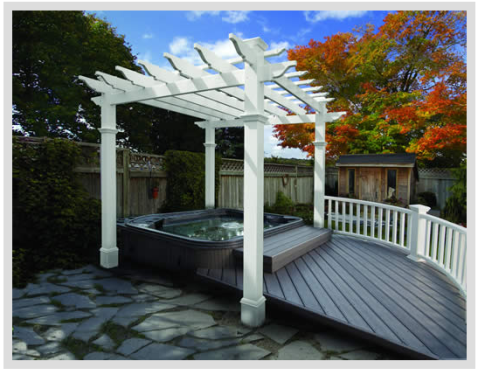
Attached Pergola Pictures
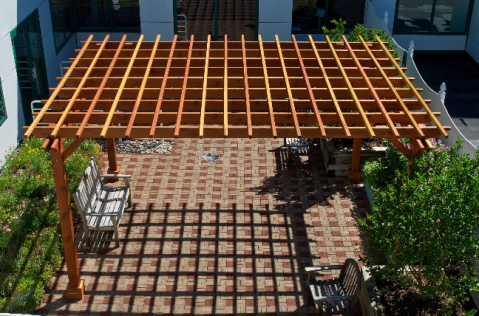
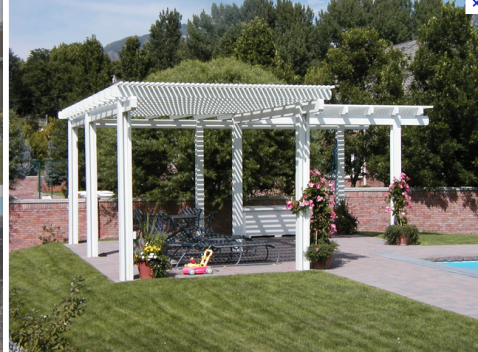
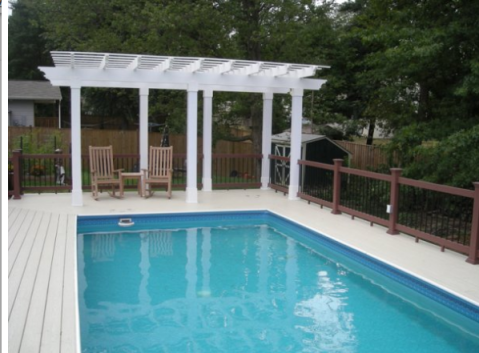
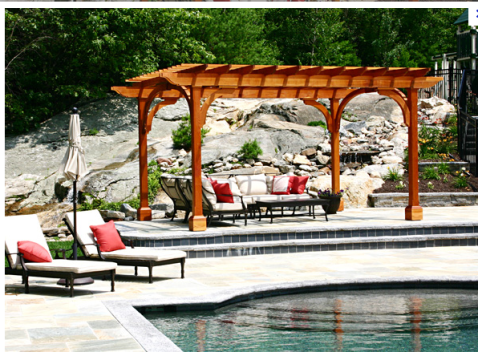
Attached pergola pictures with pergola parts identification and detailed descriptions of the design features. All pergolas pictured are very easy to build in one weekend.
Drawing Your Own Pergola Plans
Do you have any idea how easy it would be to adapt any set of pergola plans into your own? Unless you have a very large, level yard that is essentially a blank canvas allowing you to install or build just about any pergola design or pergola kit available, then you most likely need to create your own unique set of pergola plans. Drawing out your own will ensure that the pergola fits your yard exactly to your needs.
Perhaps you want to cover a concrete patio that was poured just outside the sliding glass door leading to your back yard. Instead of having the four posts and second set of beams pictured above, you would have a ledger board attached to the facing of the house and the roof pieces would only have fancy end cuts on one end. The pieces that attached into the ledger board would have a standard flat edge cut. You would also only have two knee braces or angled support boards.
Maybe you do want a detached pergola, but just in a different size. The pergola pictured above has a roof line dimension of 10 x 15. That might be too large for your space so you adjust your plans accordingly. A square roof line of 10 x 10 or 12 x 12 is also quite common and easy to draw. You would perhaps have a few less rafters. For instance, in the drawing above there are 9 rafter pieces spanning the 15 foot length. Reducing it to 12 feet might drop the rafter count down to 8.
Of course, roof dimensions alone do not drive the number of rafters and slats on your pergola design. The amount of shade you desire is also a huge factor. You many want more slats across the rafters to increase the shade provided. Or, you may want to keep it open and light and not even have that second layer of slats at all.
Pay attention to the overhang dimensions as well. In the sample above, the roof piece extend out one foot on either side of the posts. Visually, you want to plan that out in your yard to see if that will create the site line you desire. It is always a good idea to place some temporary stakes and string up some construction line to test out what views might be blocked.
As always, once you do draw out your own pergola plans, you will still want a step by step guide on how to build from your plans. With plans and a guide, you will have no trouble building your own pergola.
The Best Uses for a Pergola
The pergola has been used as a stylish and practical addition to yards for centuries. Pergolas were first used in Mediterranean gardens on lavish estate grounds to provide support for olive and grape vines. They were considered a sign of luxury. Smaller, narrow variations were used to cover cobble-stoned pathways in small towns for shade and again, to support flowering or fruit bearing vines. Flash forward to present day and here are some innovative ideas for pergola design and use in the modern yard.
A patio cover is the most common
Attaching a pergola to the back of house so that it provides cover over a concrete patio is typically what you see. That is because this is a very practical use and is also a nice visual addition to a backyard. It makes it seem more complete and creates the appearance of an outdoor room. When the pergola style and color is matched or blended with the overall architecture of the house, you have an addition that adds value and enjoyment to the property.
Kitchen pergolas are inviting and entertaining
If you have a large yard and have decided to install an outdoor kitchen with stone counters and a built in bbq, then the perfect way to partially shelter the area is to cover it with a pergola. Often the pergola posts are set in stone pillars that match the kitchen counters. The roof line can be more tightly laid together to create more effective shelter and shade. Lights are also strung up to make it an inviting space day and night.
Imagine a romantic swing pergola
A very fun addition to a free standing back yard pergola could be a bench swing. There would simply need to be some extra center roof beams placed for additional support to safely hold up the swing. If you set the pergola in a spot of the yard where the swing faces the nicest views, then this lovely spot becomes your favorite place to relax outside. A swing pergola would be a lovely surprise for the next person who buys your house.
Consider the old world use
There is a reason pergolas were originally built as support for vines – they are perfect for that task. Place the pergola in the best spot for growing some wisteria for instance. Place the plants right near the posts and secure the new growth shoots to them. Fairly soon you will have the beautiful purple flowers dangling from the rooftop of the pergola. It is one of the most inviting and romantic garden seating areas you can create.
Imagine a pergola in your front yard
For houses with a front entrance gate, the addition of a pergola is another excellent idea. The pergola posts can be secured to the top of the wall or fence on either side of the gate create a covered entrance. It is a fairly cheap and easy to build addition creating a more finished and formal look to the entryway. If you have a long walkway from the gate to the front door, consider building a pergola that covers the walkway – again harkening back to the old world use. Seeing a pergola at the front of the house always catches the eye.
No matter the use, a pergola is a fantastic addition to any yard. Big or small, attached or detached, covering a gate, patio seating or an outdoor kitchen. Sometimes they are even used as carports. Pergolas are versatile and practical and most of all, elegant and stylish structures which add value to your property. You can’t go wrong building a pergola.
Pergola Building Tip: Don’t Forget Post Trim Pieces!
There is one add on to any pergola design that we recommend you do at a minimum and that is attaching some sort of trim piece to the base of the pergola to cover up the hardware used to attach your post to the ground. No matter which method you use for attaching your posts – concrete slab, concrete holes in the ground, or a deck – it really makes a huge difference if you attach trim.
The top example is of a pergola post base with the aluminum post bracket left uncovered. The shiny silver metal and screws give the pergola an unfinished appearance. This is fine if you are going for a very basic, no frills look of course. However, it only takes a few minutes cover that with a very inexpensive set of trim pieces.
The middle photo shows a copper plate which is a lovely blend with the stone and darker wood. The bottom photo shows a post with additional matching wood trim pieces nailed on. With the wood trim option you can experiment with the height of the trim pieces too to create different looks – again without really adding any more time to the process.
When building a pergola even on a very tight budget, this is a very simple, cheap addition to the design that makes it look all that much more elegant and complete.
Add Some Curves To Your Pergola Roof
Curved roof pergolas are a luxurious design edition to any yard or patio. The elegant lines are truly no more difficult to build than a regular straight edge. There are many beautiful kits you can find such as the one in the photo above from Forever Redwood. They come complete with step by step instructions on how to build it along with all the attachment hardware needed. Boards are cut and stained according to the design you want and marked so that you are pretty much just putting slot A into tab B.
However, if you want to build the pergola yourself, a curved roof design is also an option and you shouldn’t be deterred from working with the roof pieces cut with a curve. From the example above you can see that redwood is an excellent choice for a pergola and will bend very nicely. Don’t worry! You don’t need to do any bending. A good lumberyard will be able to provide you with the curved pieces according to your required dimensions.
Notice that the ends of the curved rafters are kept with a straight cut. This is also true of other kits we’ve found as well. Once you have pieces curved and measured out for the correct arc, you really don’t want to mess with cutting fancy edges at that point. Some designers think any fancy edges are overkill and it certainly does keep the focus on the graceful lines if you keep it simple. But the example above also looks beautiful with the fancy edges reserved for the straight beams and top level of rafters.
The curved roof might be a little bit more cost, but we promise it will not add extra work to your building project. In the end, it would be something that will provide an even more unique look to your pergola design.
Pergola Designs for Small Yard Spaces
When looking around at pergola designs it is important to keep in mind that you can really create just about anything you want even if you have a smaller or oddly shaped yard. The picture above shows an example of a 3 post triangle pergola design that fits perfectly in a smaller, narrow yard. It adds character and style and shade to the patio area without overtaking the yard or making it look too small.
The key to planning this yard started at the beginning with proper site preparation before choosing which pergola they wanted to build. It just takes a little imagination to picture potential placement and design. The posts are actually secured in the ground with concrete footings dug in since the flagstone would not be strong enough to hold the pergola in place.
Since they were digging into the ground they had to avoid any water or utility lines which most likely influenced the placement of the pergola. At the point they could have tried to squeeze in a more traditional sized four post design, but since the space is small meaning the beam spans wouldn’t be that long anyway, there is no issue eliminating one post creating a triangle instead. With two layers of rafters there is still plenty of shade provided.
It is always a great idea to spend some time at a site like this one to learn everything you would need in order build your own pergola that will last for years.
Vinyl Pergola Parts
When looking for information to help make a decision about pergola designs and material selection, it is most common to see and learn about different wood products. Wood is readily available in local home improvement centers and lumberyards making it the most inexpensive option initially. Whether you are looking for parts to build your own pergola from a set of plans, or even checking out pergola kits, from the start you can see that wood will not break your budget. However, you probably also find many examples of vinyl pergolas, particularly when you are looking at kits. So why should you consider vinyl?
The huge advantage to vinyl is in how well and long it lasts with literally no ongoing maintenance. If you have any sort of wood product in your yard – a fence, a gate, or patio furniture for instance – you have already learned that you cannot just leave it alone and expect to look beautiful without assistance. Even when properly pressure treated and stained, over the years the rain, snow, rain and hail will wear it down. Insects can attack it threatening the structural integrity of the structure. You need to restrain and treat the wood every few years in order to prevent any of that damage. Wood is certainly desirable for the look it provides, but there is a reason it is cheaper and you do need to be prepared for ongoing care. Vinyl simply needs to be hosed off now and then to keep it clean. That’s it! So you might pay more up front, but then your done. No more effort or cost.
Vinyl is a synthetic material that is impervious to weather and insect damage. It is also not always a solid piece. Typically the vinyl is covering either a composite wood or, as in the examples shown above, an aluminum core. And yes, you can buy parts to build your own. Look for plastic suppliers vs lumberyards. Vinyl fencing and decks are very common and it is quite easy to purchase individual pergola parts from those types of vendors. Aluminum core materials are more expensive than wood composite core but both are available.
The best possible solution that we have found is this Liberty Vinyl Pergola Kit. The list price starts are just under $1,100 and that is really quite a good price for a pergola kit and complete building instructions. You will just need one day and two people and incredibly basic tools to put it together. No cutting or measuring required.
A Pergola Design For Every Yard
You’ve decided it is time to spruce up your yard and have wisely determined that a pergola would be the fastest and easiest way to do that. So which pergola design will you choose?
Now, if you already have a concrete patio area you will most likely choose to build your pergola over it. An attached pergola is a great option especially on a budget since it eliminates the need for two posts. In fact, a basic 8 x 8 or 10×10 attached pergola with one a roof comprised of one layer each of rafters and purlins (or slats), is less than 30 pieces of material depending on how much shade you want. The tighter the shade patter, the more roof slats you would need. Luckily though, that second layer of a pergola roof is generally made up of much smaller and thinner pieces of material in order to keep the load light. That translates to a lower price per piece.
Of course material selection also drives pricing. Treated pine tends to be the cheapest with cedar and redwood also excellent, though often more expensive options. Price and availability are influenced heavily by your location so it is difficult to give exact information on that topic. Check your local home improvement centers, but an even better option could be a lumber center if there is one near you since they can often get the best prices and will cut pieces ahead to meet the needs of your pergola plan.
As you can see from the images above, detached pergolas are also excellent design options and really do not take that much more time or budget. Don’t think you need to be limited to four posts either. There are some wonderfully unique designs with 3, 5, 6, 7, or 8 posts too. If your budget will allow it, there are some great, larger pergola designs that also are not that complicated to build. In fact, the video below shows a six post rectangular pergola being put together in just one day – after the posts had been set in place – by just three guys:
The posts for the pergola in the video were set in place the day before. Which means that this is a great example of how to build a pergola in one weekend. Especially if you choose a simpler pergola design. Hopefully this has shown you that building your own pergola is an excellent way to start your yard improvement project.
Pergola Roofs
As you think about the pergola design you would like to build in your yard, keep in mind how the roof will look from all sight lines. Consider too, just how much shade you want it to provide and what is the best placement for you to take advantage of that shade from all possible sunshine angles. It can be quite easy to overlook the many details of your pergola roof but you really don’t want to fall into that trap!
In the photo above this redwood pergola rafters and slats are the same two inch width. This provides a uniform square pattern on the ground that is very appealing to the eye in combination with the concrete pavers. The slats are also placed quite close together to increase the shaded areas. While increasing the slat and or rafter count will increase the overall costs of the pergola, if the ultimate goal is to cool off a particularly hot and sunny spot, then it will be worth the small increase.
You should also put up some construction stakes and line to give yourself a preview of what your pergola will look like before you get started. If you have a two story house you want to get an idea of what a view like the one above would look like. Will the pergola roof block or distract from any existing views that you want to keep? What about your nearest neighbors? If there are no local home owner’s or permitting rules instructing you on height or view blocking limitations, you should still be a courteous neighbor and try not to build anything that will be an eyesore.
Finally, you should go an sit out where you want to build your pergola if the area is to be designed for seating. Look around you and see what your views will be like. Look up and see who is potentially looking down on you! What will the wind be like in that spot? Will you perhaps want to put up a partial lattice wall on any particular side for either privacy or wind protection? If you take the time to think about all these little details you will be even more happy with the pergola design you choose.
Better to layout and preview your pergola plan twice, and on build it once than the other way around!
As always, for the best darn email tips and instructions on how to build a pergola, visit PergolaDIY.
Pool and Spa Pergola Ideas
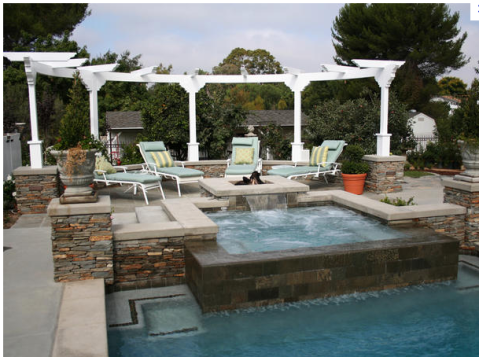
As you make your way around your neighborhood or the internet in your search for pergola plans and ideas for different possible designs, you might notice that they are quite popular structures to place around back yard water features. You can get very creative when thinking about where to place your pergola and what shape and size to use. The example above is a corner wrap design. It almost looks like two separate pergolas but the roof pieces do connect in the back. It is still a very simple design though with standard square posts on concrete, and single layer beams, rafters and slats. The overhang is quite short and end cuts are very basic.
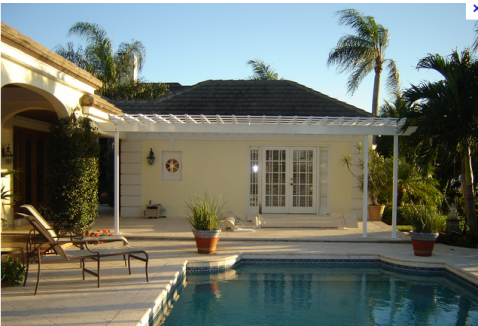
You will notice that the majority of waterside pergolas will be made with a white vinyl material. This is the best type for withstanding the excess moisture of a pool or spa. It is a little more expensive at first, but then upkeep is minimal with no cost. Just hose off the pergola to keep it clean, but you wont need to reapply stain or treat it. The pergola above on a deck at the end of the pool is designed to match the pool’s rectangle shape. Six square posts are secure to the deck. Again the roof design is simple though the edges of this one have a more sharply angled cut and longer overhang.
There are times, of course, when wood is just what you happen to want and it also looks beautiful at the edge of a pool. The area surrounding the pool in this yard is a perfect compliment to the cedar pergola. The four post design is attached to the concrete with some nice base trim pieces and supporting knee braces between the beams and rafters that provide a more complete, elegantly curved look. The roof line is again, otherwise quite standard with just one layer of rafters and slats to provide just the right amount of shade for the seating area.
This pergola design is something you typically see at a resort. It is just there for style and does it ever work! The curved vinyl design set up on pillars provides a very regal boundary at the edge of the spa and pool seating area. There is no real shade being provided here since it is just a single line of posts holding up a minimal series of rafters on the curved beam. Extended trim pieces at the tops of the posts deliver additional style and support for the beam and rafters.
Bringing it back to a more useful example – the attached vinyl pergola above is a classic. The roof line is again quite simple, but the slats and rafters are cut a little thinner than usual and placed closer together to provide more shade.
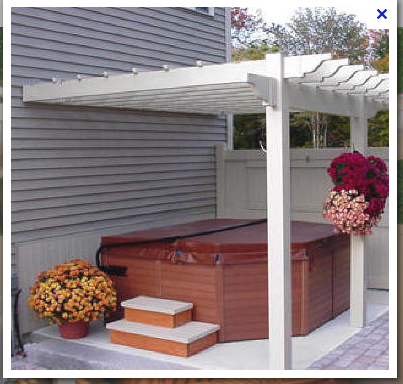
Spa pergolas are truly inexpensive and easy to build. They typically have to cover a much smaller space such as the one above. The attached pergola with two square posts attached to the concrete only has 7 slats and 7 rafters so the material cost is quite low. The labor to build this would also be minimal. Two people could most likely put it up in one day.
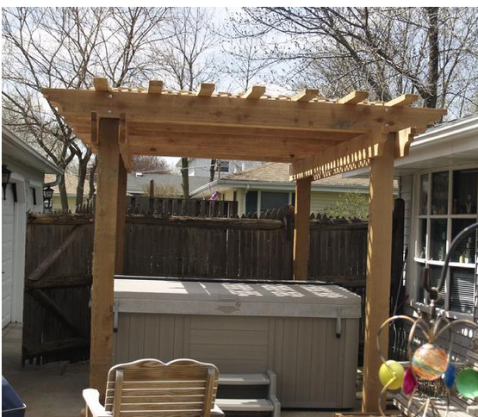
Just like with pools, sometimes you still want to see wood around your spa, Pressure treated pine is the cheapest and as long as you are willing to spend a day every few years re-treating the wood it will last just fine. This is a very simple, four post square pergola with nice, thick roof pieces for maximum shade. This one could also be put up in one weekend by two people quite easily.
The spa pergola above is a little fancier than the others of course. This is a beautiful blend of different materials for the deck, fence and pergola. The posts are actually secured in the ground between flagstone pieces. You cannot properly secure a pergola on flagstone as it doesn’t provide sufficient stability. It’s best to remove the stone to dig holes for the posts. There are nice trim pieces added here on the posts and the top and the bottom including caps to match the fence posts. Like the previous two examples there is only one row each of 7 rafters and 7 slats so the basic pergola itself would not cost much more in materials or take much longer to build, if at all.
If these designs have inspired you, I encourage you to take a short survey and sign up for this email series and follow the steps to claim your free pergola plan and then to get the discount for the Guide to Building a Pergola in One Weekend. With all that information in hand, you will have what you need to create your own poolside pergola or spa pergola.


