Securing Pergola Posts to Last a Lifetime
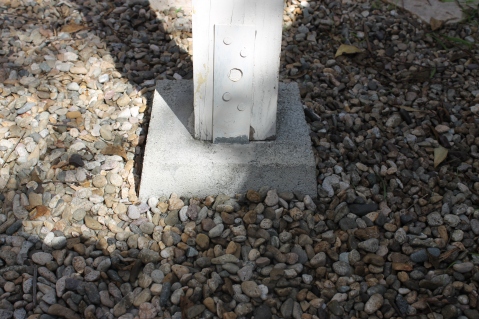
Pergola posts secured in concrete footings dug into the ground of a pebble and stone yard. The raised footing keeps it out of any standing water. The concrete footing provides stability to withstand heavy winds. The missing post base trim pieces show you how bad it can look if left uncovered. However, this pergola is over 20 years old and is structurally as sound as it was the day it was built. Some fresh paint and the addition of trim pieces will make it look new in just one day.
For more information on how to secure your pergola posts – read more here.
Take the survey, sign up for the email instructional series and get the guide that will teach you how to build a pergola that will last as long as mine!
Join the Free Pergola Building E-Course
Are DIY Pergola Plans As Easy as TV Makes Them Look?
This is a frequently asked question on the pergoladiy surveys. Many people watch the home improvement shows which inspire them to embark on all sorts of projects and inevitably they find out that things are not always as easy as they look on TV!
However, creating your own pergola plans and then following them to build your own pergola is not one of those. Yes, it really is that easy! It is especially easy if you start off with a set of existing plans or pergola kit assembly instructions and adapt them for your own yard.
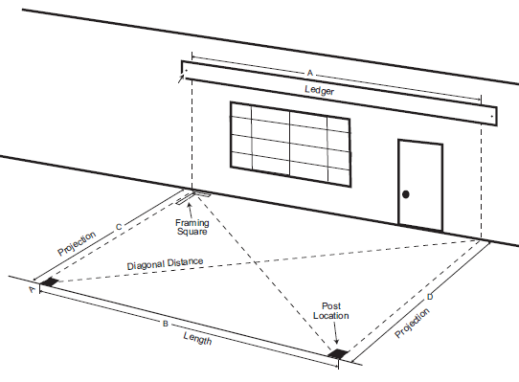
This layout for the framework and base of an attached pergola is the perfect foundation to start out if you want to an attached design. It does not matter what material you will be using, or whether you will be putting your posts in the ground, on a deck or in concrete. This basic layout works for anything. The point is to get the idea of the angles and placement in your yard. Projection means the amount of overhang that the roof edges will have. Typically, a rafter piece will project 6 inches out from the posts on both sides. That is not a hard and fast rule, just a general guideline. Just make sure you do account for that overhang when measuring out the dimensions you want. You don’t want the roof pieces to be blocking any views or hitting any trees or other structures.
With a detached pergola, the layout is much simpler. It is all about here you want it in your yard, what shape and how big or small. If you already have an existing hardscaped patio area that makes your decision even easier. Just lay out the markings for post placement according to where you want it on the patio. Always check your diagonals to make sure the dimensions you set will provide straight and true edges and angles.
From there it is just a matter of the style you want and the amount of shade you need. Single or double beamed? Two layers of rafters or rafters and slats? How close together? Curved or straight? No matter what you decide on those, as long as you have your foundation drawn out, you will be set to get started.
Sign up now for the best emails series of tips and tricks anywhere and you will really see how easy it is to build a pergola with your own set of pergola plans.
Attached Pergola Construction
A very common question asked when people take the survey over at Pergoladiy is: “How do I attached a pergola to my house?”
Attached pergolas use a ledger board secured to the wall of the house in lieu of posts. These typically end up being 2 post pergolas, but that does not have to always be the case. If you have a larger patio you want to cover, then they can easily be expanded to 3 or 4 columns or even more. The only limitation is the roof load and not using beams so long that they would begin to sag over time.
No matter how big or small though, the standard method for attaching the rafters to the ledger board is with joist hangers. If you are like me, the first time you hear someone mention a joist hanger you are thinking “A what now?”
Since this is such a commonly asked question, I imagine I am not the only one. So, here you go, these are joist hangers:
Joist hangers allow you to set the straight cut edges of the rafters into the base – to hang them you could say – as you then screw them into place. This is something to keep in mind about an attached pergola. In addition to reducing the number of posts needed, the roof pieces that will be attached to the ledger board only need to have one fancy end cut.
Attached pergolas tend to be the most in demand right now and they are also the easier and cheaper alternative to a free standing design. Most houses built recently have a concrete patio poured just off of a sliding glass door to the back yard, it is quite common to want to attach a pergola over the concrete to create a shaded seating area.
Since it is so easy to attach two posts to a concrete slab and then you save material money by reducing the number of pieces needed and not needing as many edge cuts, anyone looking to build a very lovely pergola for less than a thousand dollars can easily accomplish this with an attached design.
So what question can we answer for you? In future posts we will try to address the most frequently asked questions from our surveys. Please join the more than 500 people who have signed up for our emails and taken our survey. Hopefully we will answer your most critical question next!
Pergola Building Tip: Don’t Forget Post Trim Pieces!
There is one add on to any pergola design that we recommend you do at a minimum and that is attaching some sort of trim piece to the base of the pergola to cover up the hardware used to attach your post to the ground. No matter which method you use for attaching your posts – concrete slab, concrete holes in the ground, or a deck – it really makes a huge difference if you attach trim.
The top example is of a pergola post base with the aluminum post bracket left uncovered. The shiny silver metal and screws give the pergola an unfinished appearance. This is fine if you are going for a very basic, no frills look of course. However, it only takes a few minutes cover that with a very inexpensive set of trim pieces.
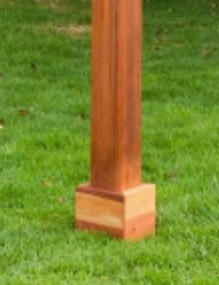
The middle photo shows a copper plate which is a lovely blend with the stone and darker wood. The bottom photo shows a post with additional matching wood trim pieces nailed on. With the wood trim option you can experiment with the height of the trim pieces too to create different looks – again without really adding any more time to the process.
When building a pergola even on a very tight budget, this is a very simple, cheap addition to the design that makes it look all that much more elegant and complete.
Securing Pergola Posts – So Much Easier Than You Think!
You want to build your own pergola, but I know that you, like me, are feeling a little apprehensive about getting started.
How can I do this and make sure my pergola doesn’t blow over at the first heavy wind, right? We understand and you should go ahead and relax. It’s easy and the hardware is inexpensive (heck, it’s downright cheap!)
Securing a post to concrete is the most common method of installing a pergola. It is also the easiest by far. A bracket, a concrete anchor (also known as a Tapcon) bolt and then some lag bolts to attached the post to the bracket. The wood trim nailed on after is probably the most crucial step.
Don’t skip it! Why? Because it is a very inexpensive few pieces of wood that make your pergola look so much more complete. No ugly exposed brackets weathering away in the elements. The treated and stained wood will last long and look beautiful.
The bracket mounts also provide the recommended 1″ clearance between the concrete and the bottom of the wood post. Even with pressure treated and stained timbers of any type you really don’t want them standing in accumulated water. And unless you live in the high desert of the southwest, you know you will have times during the year when water will accumulate either via heavy rains or melting snow.
No matter what type of base you will use for your pergola, the newly released version 2 of a Guide to Build a Pergola in One Weekend will describe and show you via illustrations and pictures like those above just how to tackle the foundation of your pergola project.
The Guide also includes two sets of free pergola plans and it teaches you how to draw your own. Don’t miss out on this great deal!
Pergola DIY Tips
The first tip we will share with you about building a pergola is this: notches.
Yes, notches. It is worth every minute that you take to gather all your roof pieces and lay them out according to your design and mark off the places where they will intersect in the pattern. This will make your life so much easier when you get to the point of securing them together. It is also a great way to ensure stability is maintained for many years. Nothing will slip out of place if they are notched together. It’s like the old Lincoln Logs you used to play with, only this time after you snap the wood pieces together you get to use a power screwdriver and bolt them together forever!
Here’s what we suggest – use your jigsaw to make cut outs. Do this before you finish staining your wood. If you wood is pre-stained, then be sure and sand the newly exposed area and coat it. You don’t want those notches to be the place where moisture gets in and starts rotting away your beautiful pergola.
When you are ready to start installing roof pieces you can set them in place with the notches first and then go along and start bolting them together. Notches are standard in any pergola kit no matter what material type. Kit manufacturers create their easy assembly process by taking care of those details for you because they know how much time it saves for installation. They can’t promise you it will only take two people one day or a few hours to put the pergola together unless they take care of these short cuts for you.
The point is – follow those same steps when you do it yourself. There is a good reason for them and you will only make the process harder on yourself if you skip it.
How do we know? Well, have you ever watched someone try to build a pergola without using notches? It can be quite amusing watching all the trial and error. Even worse is seeing what happens after a few years of wind storms have stressed the un-notched connections. Rafters start to separate from beams and it’s just generally a headache. You end up replacing bolts more frequently than you have to apply new stain!
Don’t take that risk – use notches.
Setting a pergola on a concrete slab
Let’s say you have gone through all the steps for preparing your site for your pergola as covered here. Your yard may not big as the one picture above, but in the majority of examples people are looking for techniques and instructions on how to secure a pergola to a concrete slab since most patios are laid out with concrete, particularly the ones attached directly off the back of a house. So let’s cover those basic steps.
It really does take two people so please don’t try to do this on your own. Everything needs to be straight and level and true to ensure that your pergola is as sturdy safe and durable as possible. Start out by measuring to find the center of the concrete pad. You want to make sure you center the pergola on it properly.
Then measure from the center out 1/2 of the width projection of the pergola. Repeat on the other side and then use the same method for the length projection dimensions. Mark all the spots. Using a chalk line, connect the marked spots and draw out a perimeter. If building a square pergola, remember to check the diagonal measurements. They should be the same from corner to corner. Adjust the corner marks as needed.
And there you have your post locations! Bolt in your concrete base brackets and you are ready to put up your posts and get to the heavy lifting. For more information on the next steps to take to build your own pergola, please click here and check out our step by step guide. We’ve gathered everything we’ve learned from thousands of hours of personal experience, consultations with contractors and research in online builder forums. We’ve made all the mistakes, and even made up a few new ones! Hopefully, you wont have to do that. With the right information at your fingertips you might even have some fine with your do it yourself pergola adventure.
Pergola Material Selection
Choosing which material to use to build your pergola is dependent on many factors. Budget, of course, would be the first. It is quite astonishing how different the prices can be even amongst the different timber varieties. For instance, in the drawing above there are 24 pieces of wood (4 posts, 8 knee braces, 4 beams, 8 rafters). Pressure treated pine would total around $400. Cedar would total $1,000 and redwood would break any budget! A similar vinyl pergola kit would run well over $1,000. So if you are determined to spend less than $1,000 is the pressure treated pine a valid option as far as durability and appearance compared to cedar?
Pressure treated pine definitely stands up to the durability test. As long as you make sure any ends you may have to cut to create your desired pergola design are also properly treated before final construction, then this very hard, solid wood will last for decades. We know of a properly drained set of pressure treated pine posts buried into concrete casings in the ground in an area of the country where the ground freezes that were still in fantastic shape after over twenty years. The old posts had to be removed to make room for a newer, larger pergola and even the timber that was in the ground was free of moisture damage.
The bigger difference between the two materials is in their appearance. A pergola built from pressure treated pine will definitely look more rustic or natural. There could easily be visible knots in the wood. Now, the pieces can be either stained to a darker hue or painted, but that ads an extra level of ongoing maintenance as weather and wind will wear down the exterior layer and need freshening up. Cedar looks beautiful and elegant on its own without any staining or painting needed. It’s natural oils protect it just as well as pressure treating. If you are really determined to have the look of cedar, then shop around lumberyards for sales to try to bring the material cost down a little more. Otherwise, it may be completely worth it to spend the little bit of extra money to build a cedar pergola.
Pergola Design Options
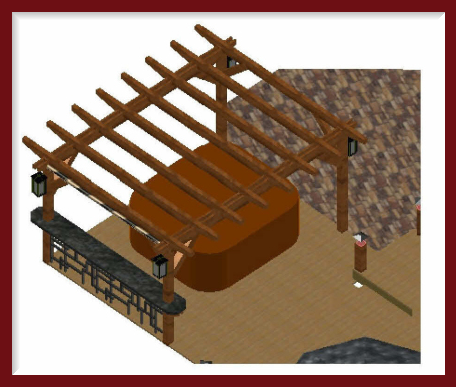
Pergola designs are endless. As soon as you start looking for one, you can easily be overwhelmed with the many options! Look at this one – could you have imagined those possibilities? Curved roof line, one wall with a set of screens you can open and close for privacy, post base accents, full lattice roof cover for extra shade and lights strung through them.
These options all together are probably quite expensive though probably not all that much more difficult to install on your own. The expense would just be in the extra material for the bases, wall & lattice pieces. Curving a roof is actually quite common with outdoor wood structures. Think of an arbor which nearly always has a curved roof. It might be a little more expensive and a little more complex planning out measurements for the proper angles, but the only pieces that are curved are the beams and rafters. Just choosing a curved roof design on your pergola would be enough to make it elegant and upscale.
The lattice slats can be purchased in sections and just attached to the rafters as you would simple, straight slat pieces. The purpose of it’s use here is to create more shade and the look of a more complete roof. The advantage is that they are very lightweight pieces and don’t add too much to the load that the posts and beam need to bear. A very creative solution.
The screen walls on a pergola are quite unusual. Since the houses here are close together, the homeowner’s were looking for a way to have greater privacy when they sit outside. The use of the screens that can open or close allows them to let in light if they want to, but to close it when they don’t. This addition is probably the most expensive one since they are solid screens with hinges that need to be properly installed. However, it is certainly something to consider if you privacy is an issue. If you only add this feature and eliminate the others it might not put you too much over budget.
The post bases are beautiful and since they are only used on two of the posts, probably not too high priced. It’s actually quite easy to attach base or top trim to posts even after a pergola is installed. These are simple trim pieces that can be nailed or screwed into place quite quickly.
If you are considering building your own pergola, here are 5 tips to follow before you get started.


